Introduction to DocuMine REST APIs
DocuMine provides REST APIs based on the OpenAPI Spec3 format that allow you to seamlessly integrate DocuMine functionalities into your products and services.
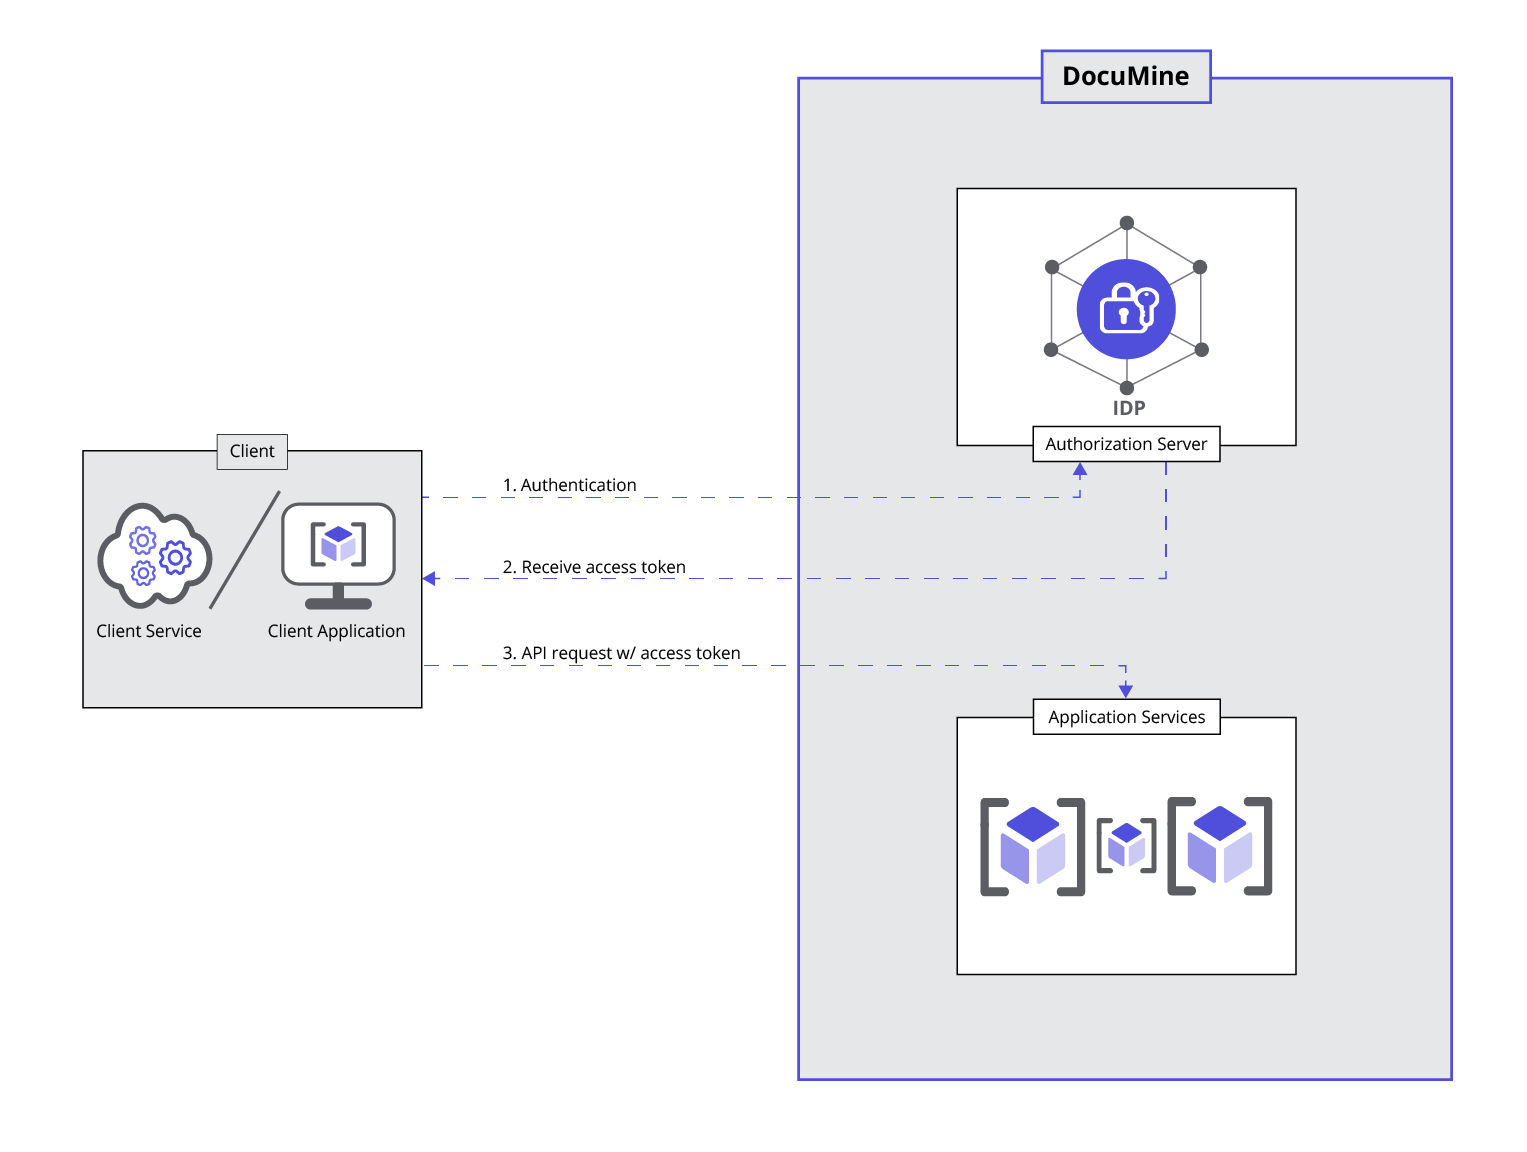
This introduction will guide you through the steps of service discovery, authenticating requests using an access token, and effectively using the APIs to streamline your workflows, and will set you up for successfully integrating with DocuMine.
Step 1: Get API specification
The API covers at least the following functionalities:
Dossier management
Create dossier
Read list of dossiers
Read dossier
Update dossier
Delete dossier
File management
Upload file
Read list of file in a dossier
Read file status
Delete file
Export of extracted components
Download of a result package
Create result package (component reports, etc.)
For single file
For multiple files
For all files in dossier
Read status of result package generation
Download the result package
Delete the result package
List Usage
Read license status of used capacity
An active DocuMine subscription grants you access to the official API documentation that is provided to you as an OpenAPI 3.0 specification. Please ask your support contact for the specification.
Official API documentation
The official API documentation is provided to you as an OpenAPI 3.0 specification. You can access it here:
For further information on the OpenAPI specification, please see: https://swagger.io/specification/.
Step 2: Authenticate
Note: The examples contain placeholders that need to be replaced by the actual parameters. For a detailed list of placeholder definitions, please see Placeholders.
The APIs are based on OAuth 2.0 authentication. You need the following information to get started:
client ID of your DocuMine instance
username and password of the account you want to use to authenticate requests.
Note: If you do not know your client ID, please create a support ticket.
OAuth authentication allows you to access DocuMine APIs securely by providing an authentication token in the header of each request. You can use these tokens to access the APIs without storing sensitive user credentials.
Authentication
Obtaining an access token and a refresh token via Authorization Code Flow
First, you need to obtain the authorization code. This is typically achieved through a browser redirect, allowing the user to enter their credentials on a secure login page. The URL for the login redirect looks like this:
${base_url${auth_path}?client_id=${client_id}&redirect_uri=${redirect-uri}&response_type=code&scope=openidTo obtain an access token and a refresh token, you need to exchange the authorization code that you received at your redirect URI.
curl example:
curl -X POST ${base_url}${token_path} \

    -H 'Content-Type: application/x-www-form-urlencoded' \

    -d 'grant_type=authorization_code' \

    -d 'client_id=${client_id}' \

    -d 'client_secret=${client_secret}' \

    -d 'redirect_uri=${redirect_uri}' \

    -d 'code=${code}'
In response to this request, you will receive an access_token and a refresh_token. These tokens expire after a set number of seconds, as specified in the response body:
expires_in defaults to 300 seconds (5 minutes)
refresh_expries_in defaults to 1800 seconds (30 minutes)
Obtaining an access token and a refresh token via Resource Owner Password Credentials Grant
Notice
According to current OAuth 2.0 Security Best Practices, this flow should be avoided. Instead, alternative methods like the Device Authorization Grant or Authorization code are recommended.
Another way to obtain a token without user interaction is by using the Resource Owner Password Credentials Grant, also known as 'password flow.'
Since the client application handles user passwords, this method should be limited to a dedicated user created specifically for this purpose.
curl example:
curl -X POST ${base_url}${token_path} \

    -d 'grant_type=password' \

    -d 'client_id=${client_id}' \

    -d 'client_secret=${client_secret}' \

    -d 'username=${username}' \

    -data-urlencode 'password=${password}'
Notice
Note (if your workspace and your client do support the ROP flow):
The password you need to provide is the local password in DocuMine. If you are using Single Sign-On (SSO), make sure you have set a password in DocuMine and do not confuse it with the password from your external SSO identity provider.
In response to this request, you will receive an access_token and a refresh_token. These tokens expire after a set number of seconds, as specified in the response body:
expires_in defaults to 300 seconds (5 minutes)
refresh_expries_in defaults to 1800 seconds (30 minutes)
Refreshing the access token
When the access token expires, you can use the refresh_token to obtain a new one.
curl example:
curl -X POST ${base_url}${token_path} \

    -d 'client_id=${client_id}' \

    -d 'client_secret=${client_secret}' \

    -d 'grant_type=refresh_token' \

    -d 'refresh_token=${refresh_token}'
Step 3: Use the API
After successful authentication, you can interact with the DocuMine APIs by sending requests to any of the available endpoints.
The OpenAPI 3.0 specification (Step 1) provides a list of all existing endpoints. Use any given path with one of the available methods.
To authorize a request using an OAuth token, include the 'Authorization: Bearer' header in each request and set its value to a valid access token.
curl example:
curl -X GET ${baseURL}${endpointPath} --header 'Authorization: Bearer' ${access_token}' --header 'X-TENANT-ID: ${workspace_id}'